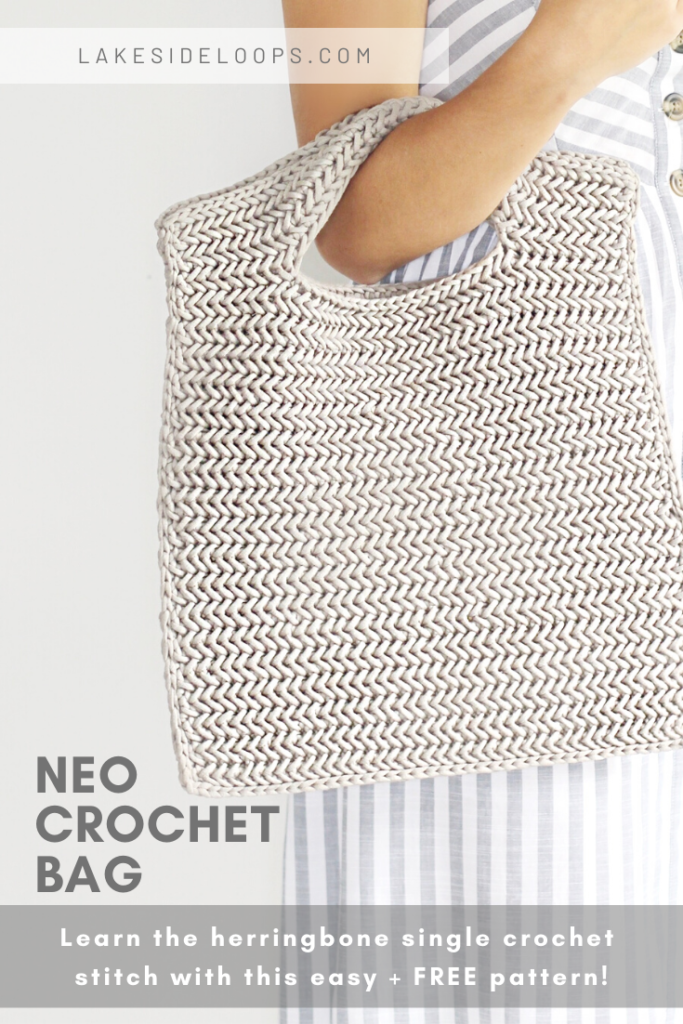
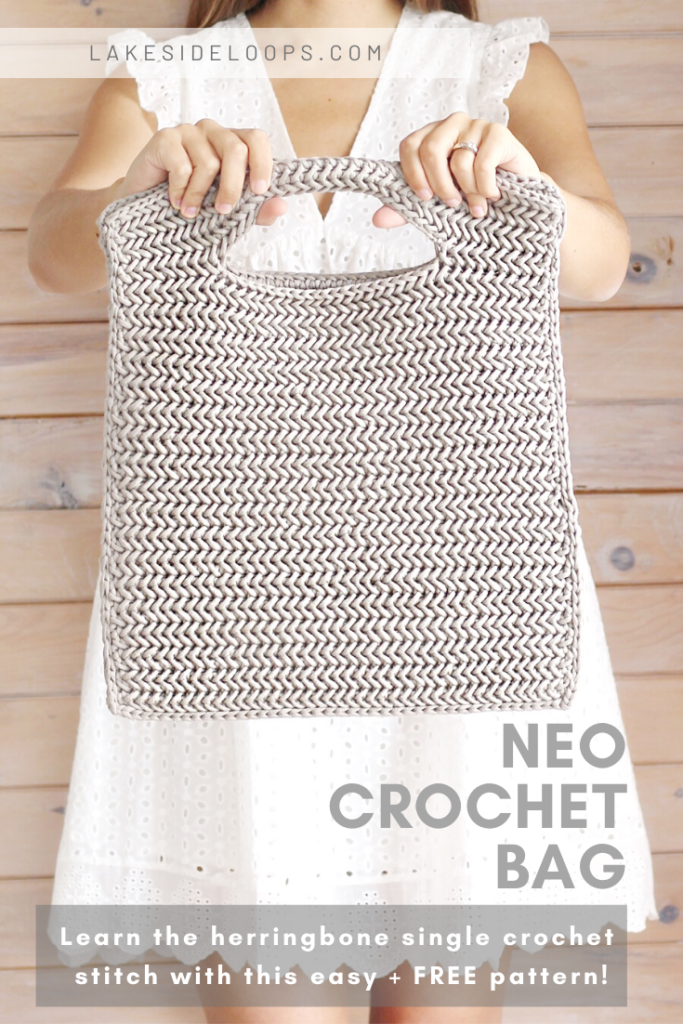
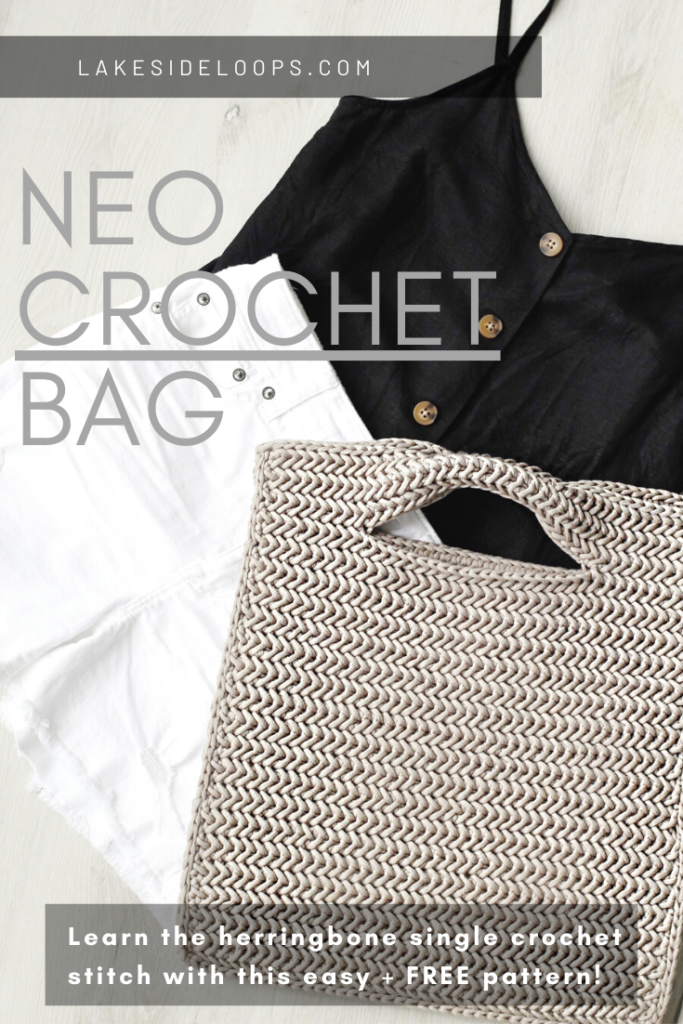
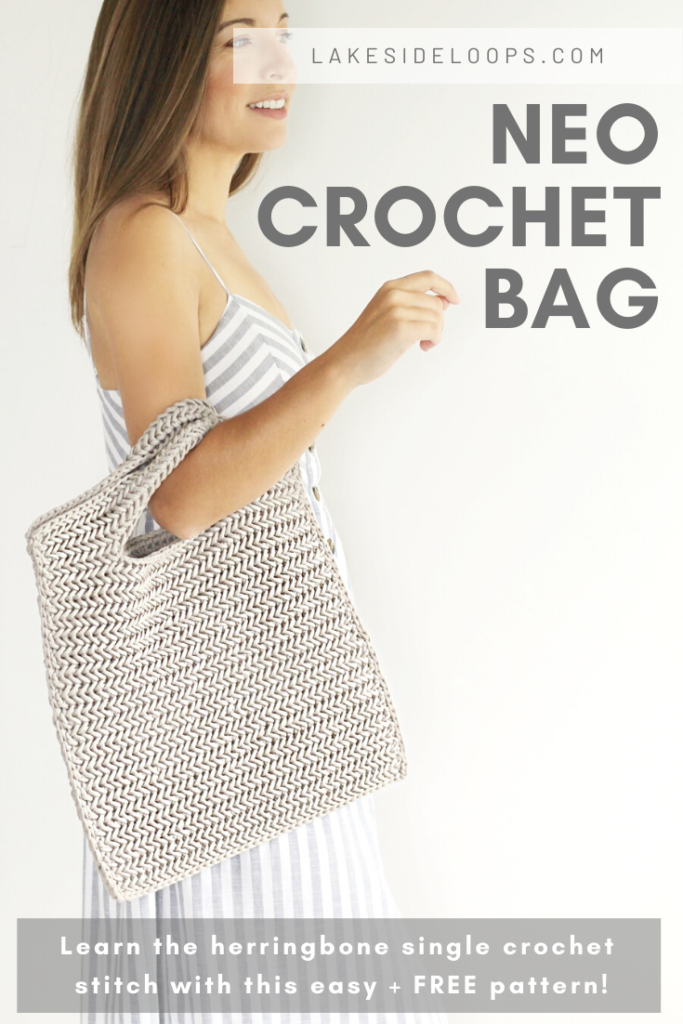
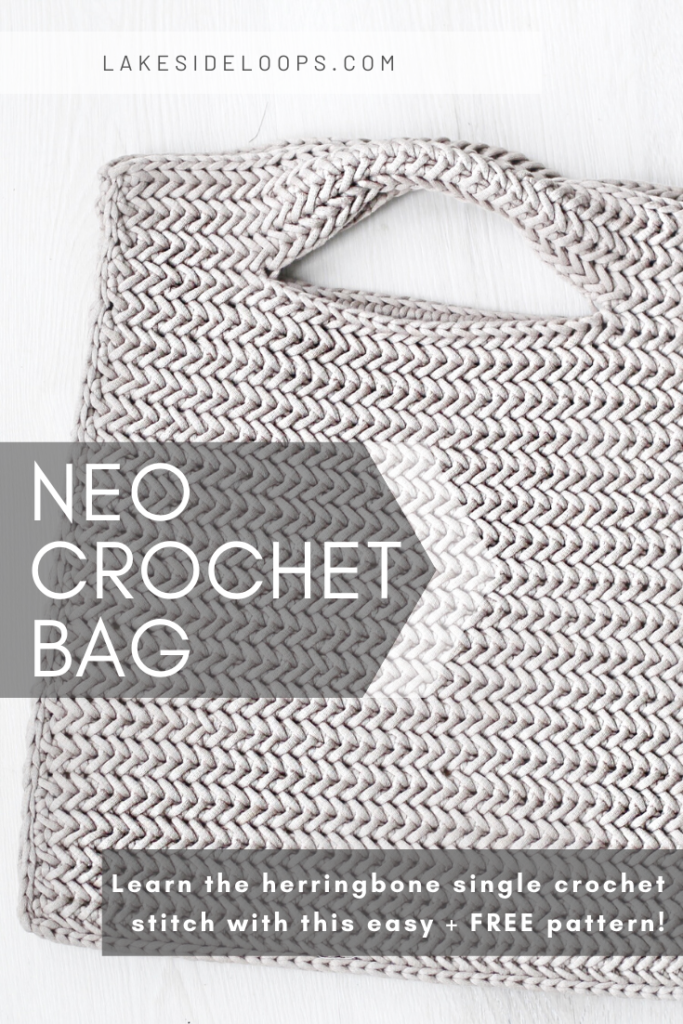
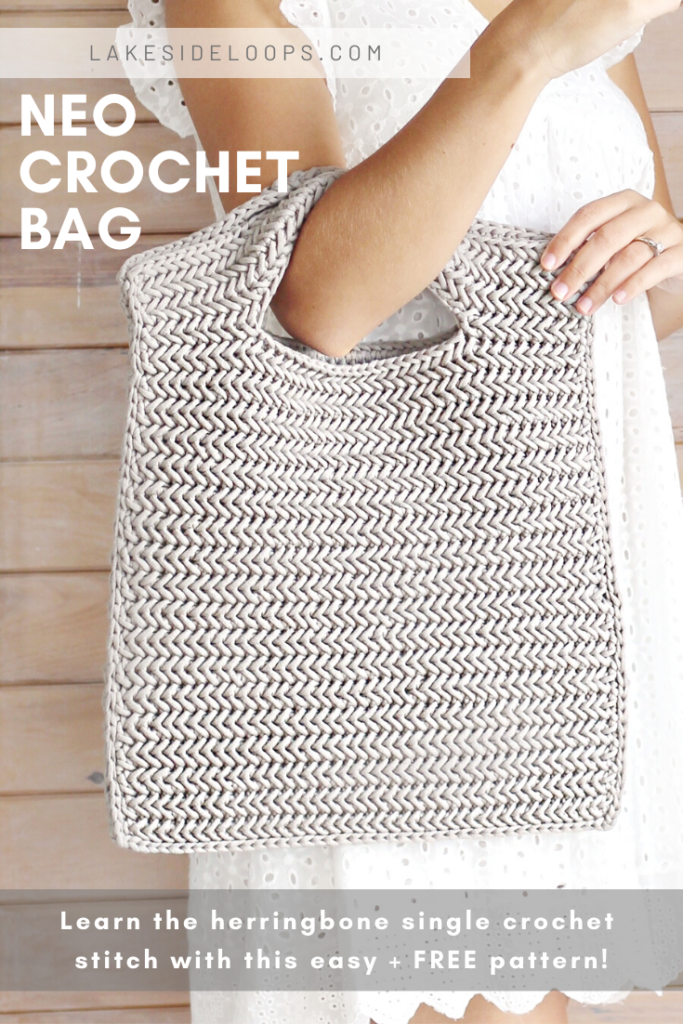
The Herringbone Single Crochet is my new favourite stitch! It’s easy, dense, and has a sleek modern look. This bag is durable, stylish, and perfect for those Summer outings to the beach, market, or your favourite downtown patio. I’m happy to offer the instructions for free (scroll down) including a video tutorial and you can also purchase an inexpensive downloadable PDF from Etsy HERE or Ravelry HERE!
I stumbled upon the Herringbone Single Crochet stitch while on Pinterest (Of course! Ha) and immediately fell in love. I’ve dreamt of recreating a herringbone look with a crochet hook (instead of knitting needles) for as long as I can remember but the closest I ever came was the Hayden Chevron Blanket (a far cry from the traditional herringbone look). I can’t believe how easy this stitch is and that with one little tweak to a single crochet stitch you can achieve this modern look.
The texture and visual appeal of this stitch goes without saying. The density surprised me though . . it creates a thick and sturdy material – perfect for a bag! The little tote still has some give thanks to Yarnspirations™ stretchy Bernat® Maker Home Dec™ yarn (seen here in ‘Clay’). I love how defined the stitches are thanks to this cotton-nylon blend yarn and it comes in so many cute Summer colours (like Blue, Aqua, Cream, and more).
I think this bag could be dressed up or down. For the pictures I wore sundresses but I think shorts and a T or tank would be just as cute. I also love the idea of using this 14″ x 15″ bag as a computer sleeve or carrier for paperwork/notebooks. The handle I created isn’t wide enough for it to be carried on your shoulders but that could easily be adjusted by increasing your chain length in Row 37 of the pattern. You could also create a larger or smaller bag simply by adjusting your initial chain length.
Before we dive into the pattern I just want to give a shout out to my little girls. They’re 9 & 7 years old and, like many, their school is closed right now which means they’re at home with their Momma 24/7. They were a wonderful help with this design offering adorable advice (like “make sure it can fit lots of toys!”) and even took all the pictures for me! So, M & M (their initials), if you’re reading this someday when you’re older, thank you for always being your sweet helpful selves!
M A T E R I A L S Hook – US K – 6.50mm crochet hook Yarn – Any bulky weight yarn (size 5 / ‘chunky’ / 12 ply) ◦ Yarnspirations™ Bernat® Maker Home Dec™ (in Clay) ▪ Amount needed: ➢ Approximately 445 yards or 407 meters (2 skeins)
G A U G E 12 stitches = 4 inches 11.5 rows = 4 inches
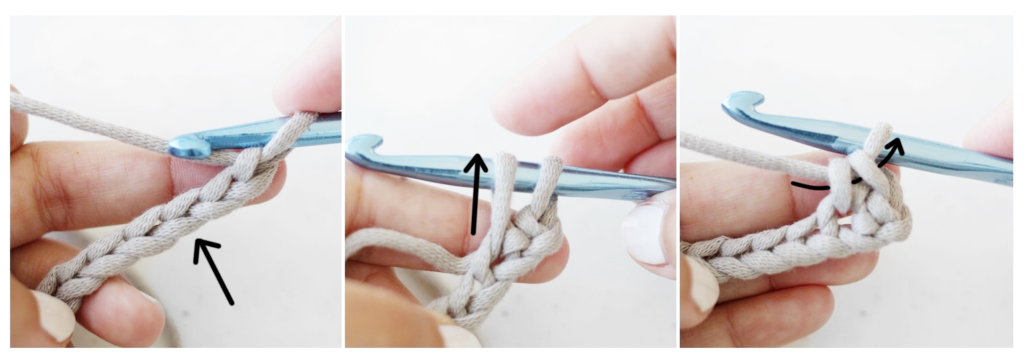
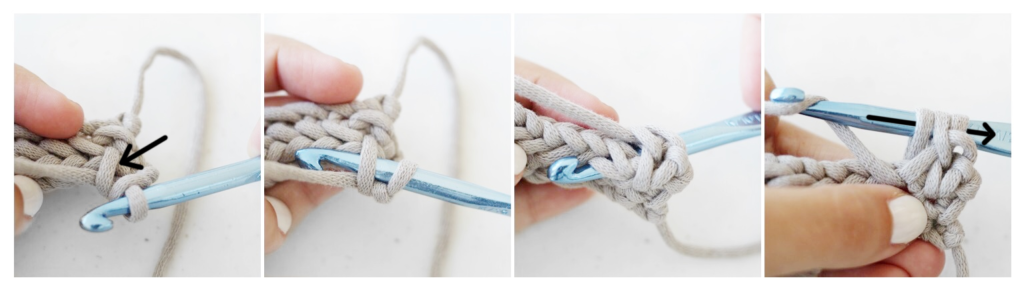
P A T T E R N A B B R E V I A T I O N S English (US) terms ch – Chain: Yarn over, pull through loop on hook sc – Single Crochet: Insert hook into stitch, yarn over and pull through stitch, yarn over and pull through all loops on hook hsc – Herringbone Single Crochet: Insert hook into previous stitch’s ‘front bar’ and into next stitch, yarn over and pull through stitch to height of previous stitch, yarn over and pull through all 3 loops on hook sl st – Slip Stitch: Insert hook into stitch, yarn over and pull through stitch and loop on hook
N O T E S • Beginning chain does NOT count as a stitch in stitch counts • Stitch count is in [ ] at the end of each row • Pattern is broken into 3 sections: 1. Front + Back Panels 2. Handles 3. Seaming
V I D E O T U T O R I A L There is a video tutorial available for this pattern on YouTube: https://youtu.be/hQ0Ga-oMIPg
W R I T T E N P A T T E R N English (US) terms
FRONT + BACK PANELS
Row 1 Chain 44 loosely sc into 3rd chain from hook, hsc until one chain remains, insert hook into previous stitch’s ‘front bar’ and into last chain, yarn over and pull through chain and all loops on hook [ 42 sts ]
[Single crochet (loosely – so stitch is the same height as chain 2) in 3rd chain from hook]
hsc – Herringbone Single Crochet:
Insert hook into previous stitch’s ‘front bar’ and into next stitch
Yarn over and pull through stitch to height of previous stitch
Yarn over and pull through all 3 loops on hook
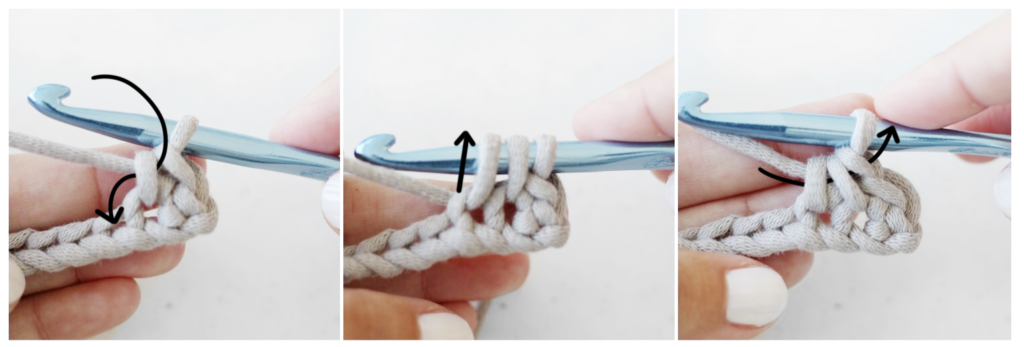
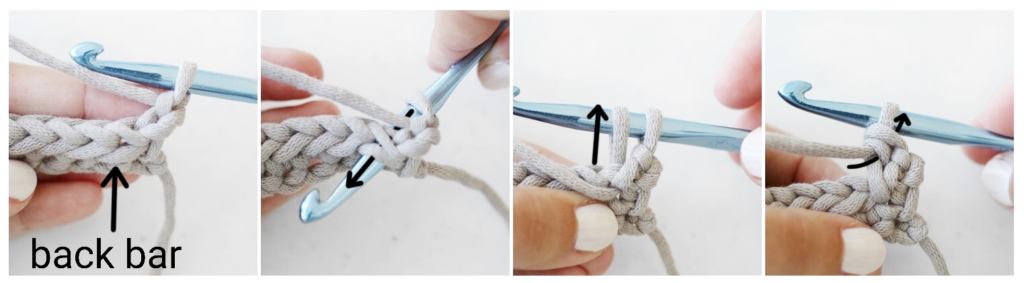
Row 2 Chain 2, turn, Working from back to front for entire row (as shown): loosely sc into first stitch and ‘back bar’, hsc until one stitch remains, insert hook into previous stitch’s ‘front bar’ and into last stitch, yarn over and pull through stitch and all loops on hook [ 42 sts ]
(location of back bar)
Working from back: insert hook into stitch and back bar
Yarn over and pull through to height of chain 2
Yarn over and pull through all loops on hook
hsc – Herringbone Single Crochet (when working back to front)
Row 3 Chain 2, turn, loosely sc into first stitch and ‘back bar’, hsc until one stitch remains, insert hook into previous stitch’s ‘front bar’ and into last stitch, yarn over and pull through stitch and all loops on hook [ 42 sts ]
Row 4 – Row 36 Repeat Rows 2 & 3 until you finish 36 rows
Row 37 Chain 2, turn, loosely sc into first stitch and ‘back bar’, hsc in next 8 stitches, insert hook into previous stitch’s ‘front bar’ and into next stitch, yarn over and pull through stitch and all loops on hook chain 22 and skip next 22 stitches, loosely sc into next stitch and ‘back bar’, hsc in next 8 stitches, insert hook into previous stitch’s ‘front bar’ and into last stitch, yarn over and pull through stitch and all loops on hook [ 42 sts ]
Row 38 Chain 2, turn, Working from back to front for entire row: loosely sc into first stitch and ‘back bar’, hsc until one stitch remains, insert hook into previous stitch’s ‘front bar’ and into last stitch, yarn over and pull through stitch and all loops on hook [ 42 sts ]
Row 39 & up Repeat Rows 3 & 2 until you finish 43 rows
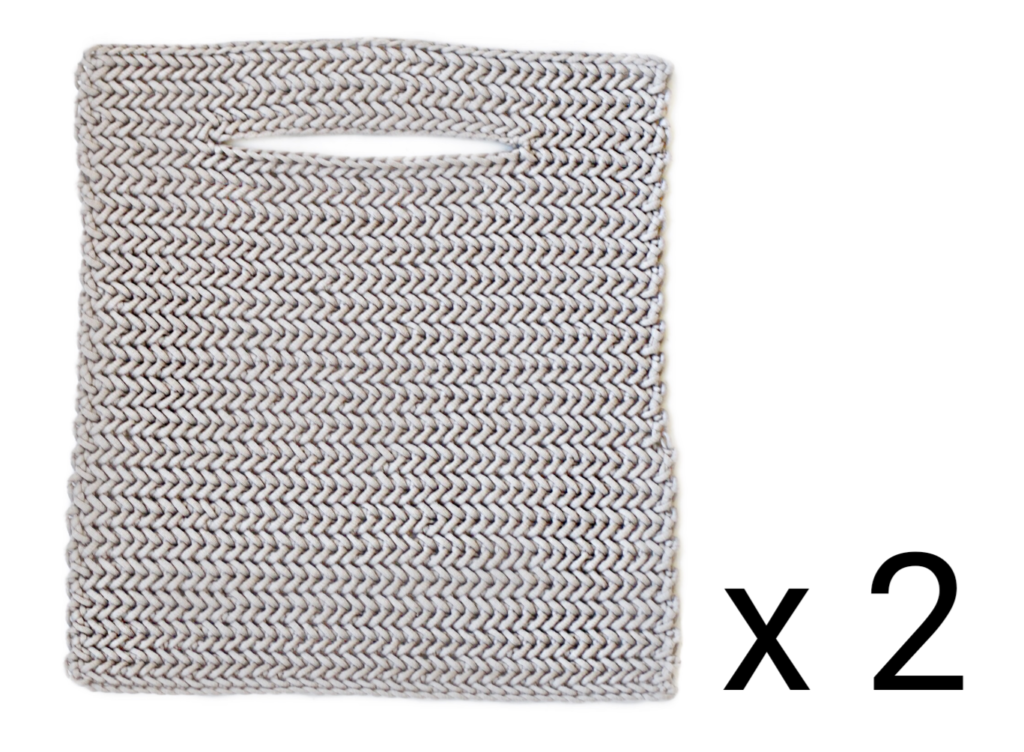
Fasten off Weave in ends Repeat to create a second panel
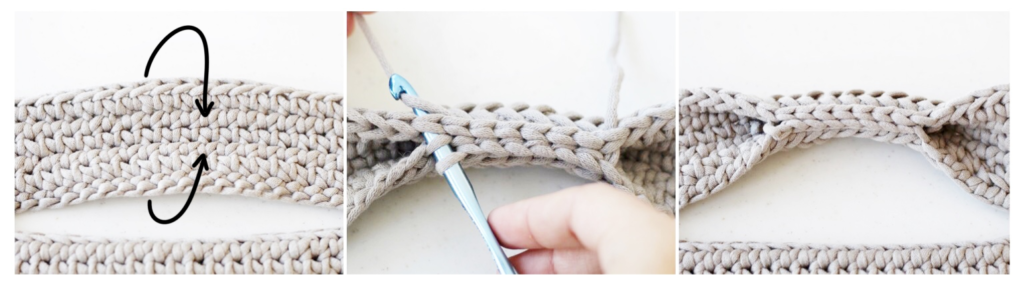
HANDLES Lay panel so herringbone side is facing down, Join the top (Row 43) and bottom (Row 37) of handle by slip stitching centre 8 stitches together as shown below
Repeat with second panel
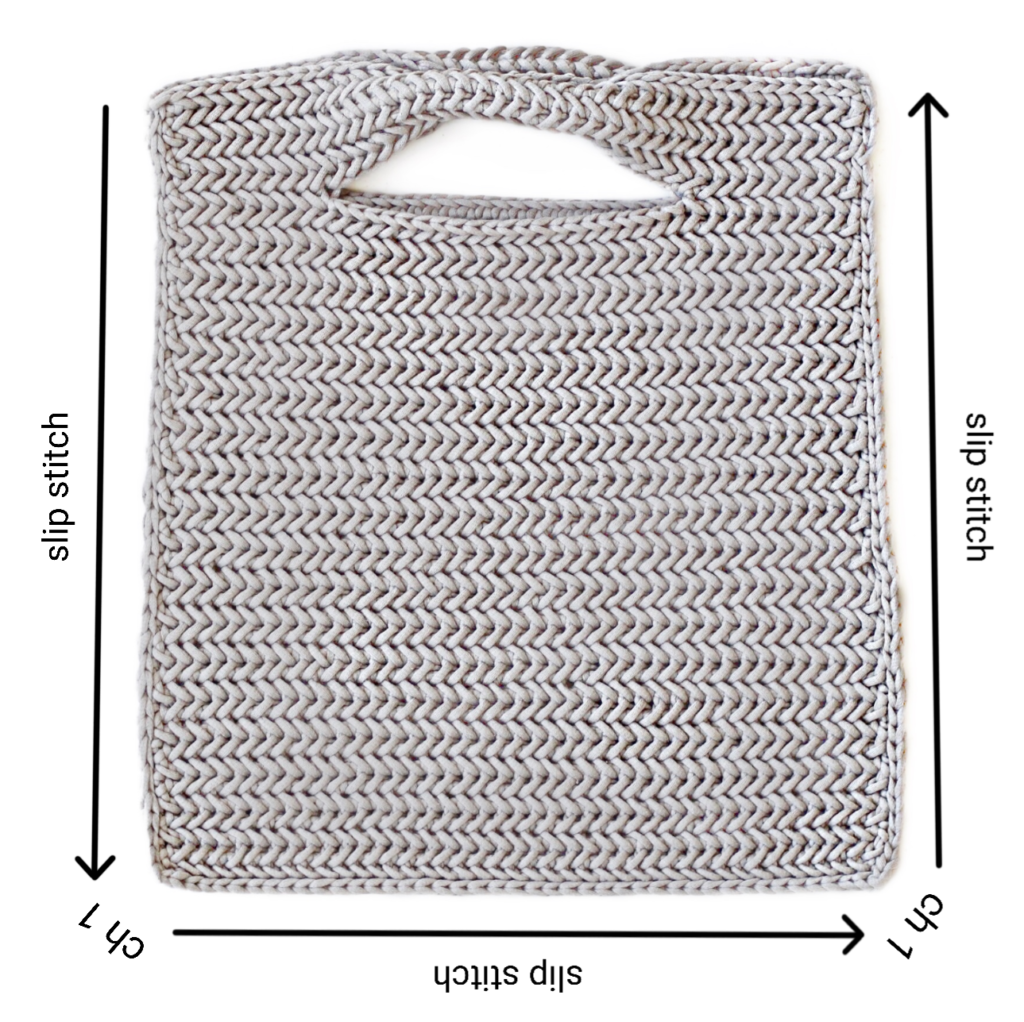
SEAMING Lay bag panels on top of one another (herringbone sides facing out) Insert hook into top corner of both panels, Yarn over, and pull through Slip stitch down side of panels to join them (approx. one sl st for each row) Chain 1, turn and slip stitch along bottom of panels to join them, Chain 1, turn and slip stitch up side of panels to join them (approx. one sl st for each row)
Fasten off Weave in ends
Thank you for L O O P I N G together this L A K E S I D E inspired project with me! I hope you enjoyed this pattern and please don’t forget to tag me in your Neo Bag pictures (@lakesideloops) because I always love seeing your work! Take care. xx
This provides a sensible distinction the local period, something want to replica watches see when you're getting started, as well as other capabilities.