Delicate crochet granny squares were used to create this beautiful patchwork top. Fun & elegant, this piece can be crocheted in any colour to wear as a cute spring t-shirt, summer cover up for the beach or pool, or as a fall vest layered under your favourite jacket. This trendy classic piece with timeless details is sure to be a hit no matter how you choose to make and style it! Scroll down for the free pattern or purchase an inexpensive downloadable PDF from Etsy HERE or Ravelry HERE!
After the success of my Isla Granny Square Sweater (shown below) a thinner even more summery version has been on my check list. I wanted this design to be more lightweight and resemble a t-shirt or top instead of a pullover. It took several tries to get the granny square to the size and look I was after (I asked my poor kids for their opinion on the circle more times than I can count) and you can see in the video tutorial just how many attempts were made. I’m really happy with the final look and can’t wait to make a second one for myself . . I think in the next size up for a looser fit.
(Isla Granny Square Crochet Sweater – FREE PATTERN)
I used Aunt Lydia’s® Crochet Thread Fashion 3 Yarn (in ‘ White’) but any super fine yarn (size 1 / ‘sock’ / 4 ply) will work with this pattern. It was easy to work with and I like the defined look of the stitches and lightweight feel of the top. I LOVE white . . if you follow me on social or know me in real life and have ever been to my home, you know . . but I think this top would be so cute in a bright pink or orange! A soft yellow would be sweet too or any shade of blue. Also black would be nice and give it a cool girl vibe I think! Whatever colour you go with please remember to tag me because I can’t wait to see your spin on it!
As mentioned above, I love white! And in particular, in the summer, I love white eyelet/lace/crochet tops. I probably have 5 or 6 of them. A lightweight delicate white top with a pair of ripped blue jeans or jean shorts . . gosh . . my fave! I read somewhere that you should try to create pieces you’re missing from your closet and really wish you owned. While I can’t say I was in *need* of another white summer top …she’s pretty and I have no regrets!! haha
F I N I S H E D S I Z E S
Adult XS/S – 32” chest, 17.5” length
Adult M/L – 42” chest, 17.5” length
Adult XL/XXL – 52” chest, 20” length
Adult 3X/4X – 62” chest, 20” length
• Close fit (bodying skimming and actual bust measurement) or classic fit (approximately 2-4” larger than actual bust measurement) depending on chosen top size and actual chest circumference
• Cropped (ends at or 1-2” below waist) but an extra row of squares could be added for longer look if desired (additional yarn required)
• Adult size pictured is a size ‘XS/S’ for a close fit on a 5’4” tall person with a 32” chest
M A T E R I A L S
Hook – US C – 2.75 mm crochet hook
Yarn – Any super fine yarn (size 1 / ‘sock’ / 4 ply)
◦ Aunt Lydia’s® Crochet Thread Fashion 3 Yarn (in ‘ White’) was used
▪ Amounts needed:
Adult XS/S – Approx. 388 yards or 355 meters
Adult M/L – Approx. 520 yards or 475 meters
Adult XL/XXL – Approx. 745 yards or 681 meters
Adult 3X/4X – Approx. 898 yards or 821 meters
Extras – Tapestry/Darning Needle
– Scissors
– Small button (15 mm button was used but any size will work with pattern)
P A T T E R N A B B R E V I A T I O N S
English (US) terms
ch – Chain: Yarn over, pull through loop on hook
sc – Single Crochet: Insert hook into stitch/chain, yarn over and pull through, yarn over and pull through 2 loops on hook
dc – Double Crochet: Yarn over, insert hook into stitch/chain, yarn over and pull through, yarn over and pull through 2 loops on hook, yarn over and pull through 2 loops on hook
sl st – Slip Stitch: Insert hook into stitch, yarn over and pull through stitch and loop on hook
C H A R T
G A U G E
Each granny square = 2.66 inches x 2.66 inches
(Follow pattern to complete square design)
N O T E S
• Beginning chain acts as a stitch but isn’t included in stitch counts
• Joining slip stitches are not included in stitch counts
• Squares are created individually, then seamed together to create top
V I D E O T U T O R I A L
There is a video tutorial available for this pattern on YouTube:
https://youtu.be/NgoQ27XqVzc
W R I T T E N P A T T E R N
English (US) terms
SQUARE
Round 1 |
ch 4, dc in 4th chain from hook (bottom of beginning chain),
6 dc in same chain,
join with sl st to top of beginning chain
[7 dc]
Round 2 |
ch 1, sc in top of beginning chain from previous round,
2 sc in back loop only (BLO) of each stitch around,
join with sl st to beginning chain
[15 sc]
Round 3 |
ch 4,
*[ dc in BLO of next stitch, ch 1 ]
repeat from * around
join with sl st to 3rd chain in beginning chain
[30 sts]
Round 4 |
ch 1, sc in ch 1 space,
*[ sc in BLO of next stitch, sc in next ch 1 space ]
repeat from * around,
join with sl st to beginning chain
[31 sc]
Round 5 |
*[ch 3, skip 2 stitches and sl st into BLO of next stitch,
ch 3, skip 1 stitch and sl st into BLO of next stitch,
ch 3, skip 2 stitches and sl st into BLO of next stitch ]
repeat from * around,
(last sl st will be into beginning chain from previous round to end round)
[47 sts]
Round 6 |
sl st in first 2 chains from previous round,
*[ch 2, 3 dc into next ch 3 space,
ch 2, 3 dc into same ch 3 space,
ch 2, sl st in next ch 3 space,
ch 3, sl st into next ch 3 space]
repeat from * around,
(last sl st will be into first ch 3 space from previous round to end round)
[69 sts]
Finish off
Weave in ends
For size XS/S make 76 squares
For size M/L make 102 squares
For size XL/XXL make 146 squares
For size 3X/4X make 176 squares
ASSEMBLY
Using your darning needle and a strand of yarn, whip stitch squares together joining at each double crochet and at the center of each chain 3 space on squares (as shown with arrows below). To avoid unnecessary loose ends, leave yarn intact after each join and simply weave through stitches in one square (as shown with dotted lines) until you reach the next area to join.
Use the below charts as reference for the positioning of squares for each size (leaving out 2-4 squares in the middle for the neck hole and a 2 square length opening in back to allow for neck hole widening + button closure).
(Left to right: XS/S, M/L, XL/XXL, 3X/4X)
*If adding additional squares for added length, attach them now as an extra row of 6/8/10/12 squares on both ends
Finish off
Weave in ends
Fold top in half so the neck hole is at top and, using your darning needle, whip stitch 3 squares together along the sides as shown below for each size (leaving out required squares for arm holes).
Finish off
Weave in ends
TRIM
Working around the bottom of top, attach yarn,
*(slip stitch in BLO of each stitch until
you reach the middle of a group of 3 double crochets, then:
sl st in into middle dc stitch,
ch 3 and sl st in 3rd ch from hook,
continue slip stitching in BLO of each stitch until
you reach the middle of a chain 3 space, then:
sl st in middle ch of chain 3 space,
ch 3 and sl st in 3rd ch from hook),
Repeat from * until you return to starting point
Finish off
Weave in ends
Working around arm hole openings, attach yarn under arm and repeat process for trim
Finish off
Weave in ends
Working around neck hole opening, repeat the above process until a corner section is reached. In each corner of the neck hole opening, work 3 double crochet into the ch 2 corner of the middle square as shown below.
CLOSURE
Using a strand of yarn make a loop that fits around the widest part of your button. Tie a knot at the base of loop and attach loop to the top of one side of opening at back of top
Attach button to opposite side of opening at back of top
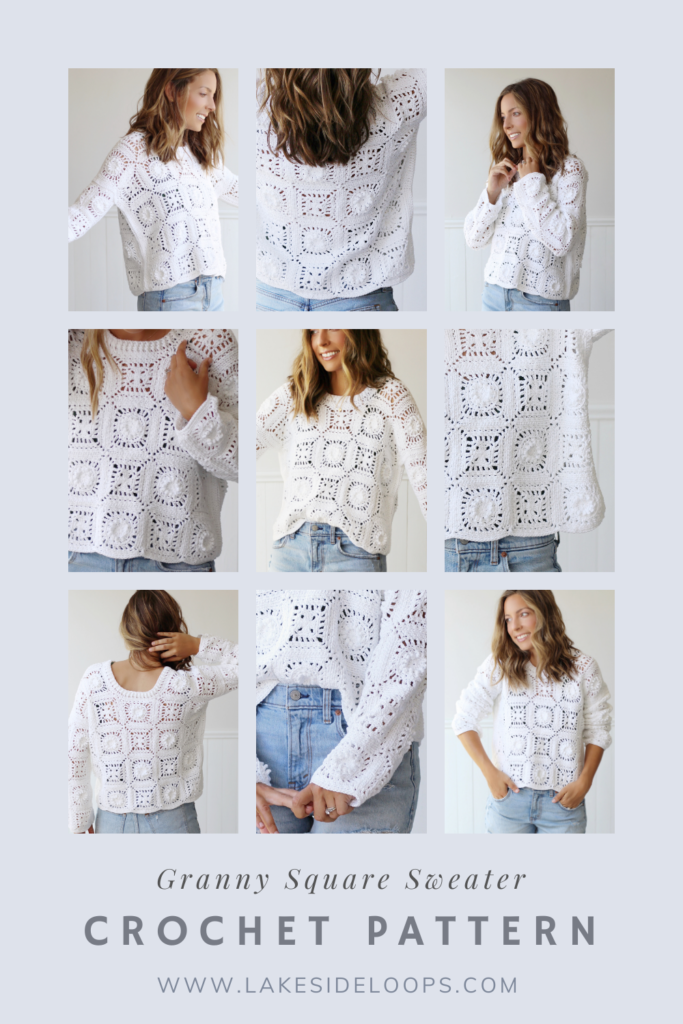
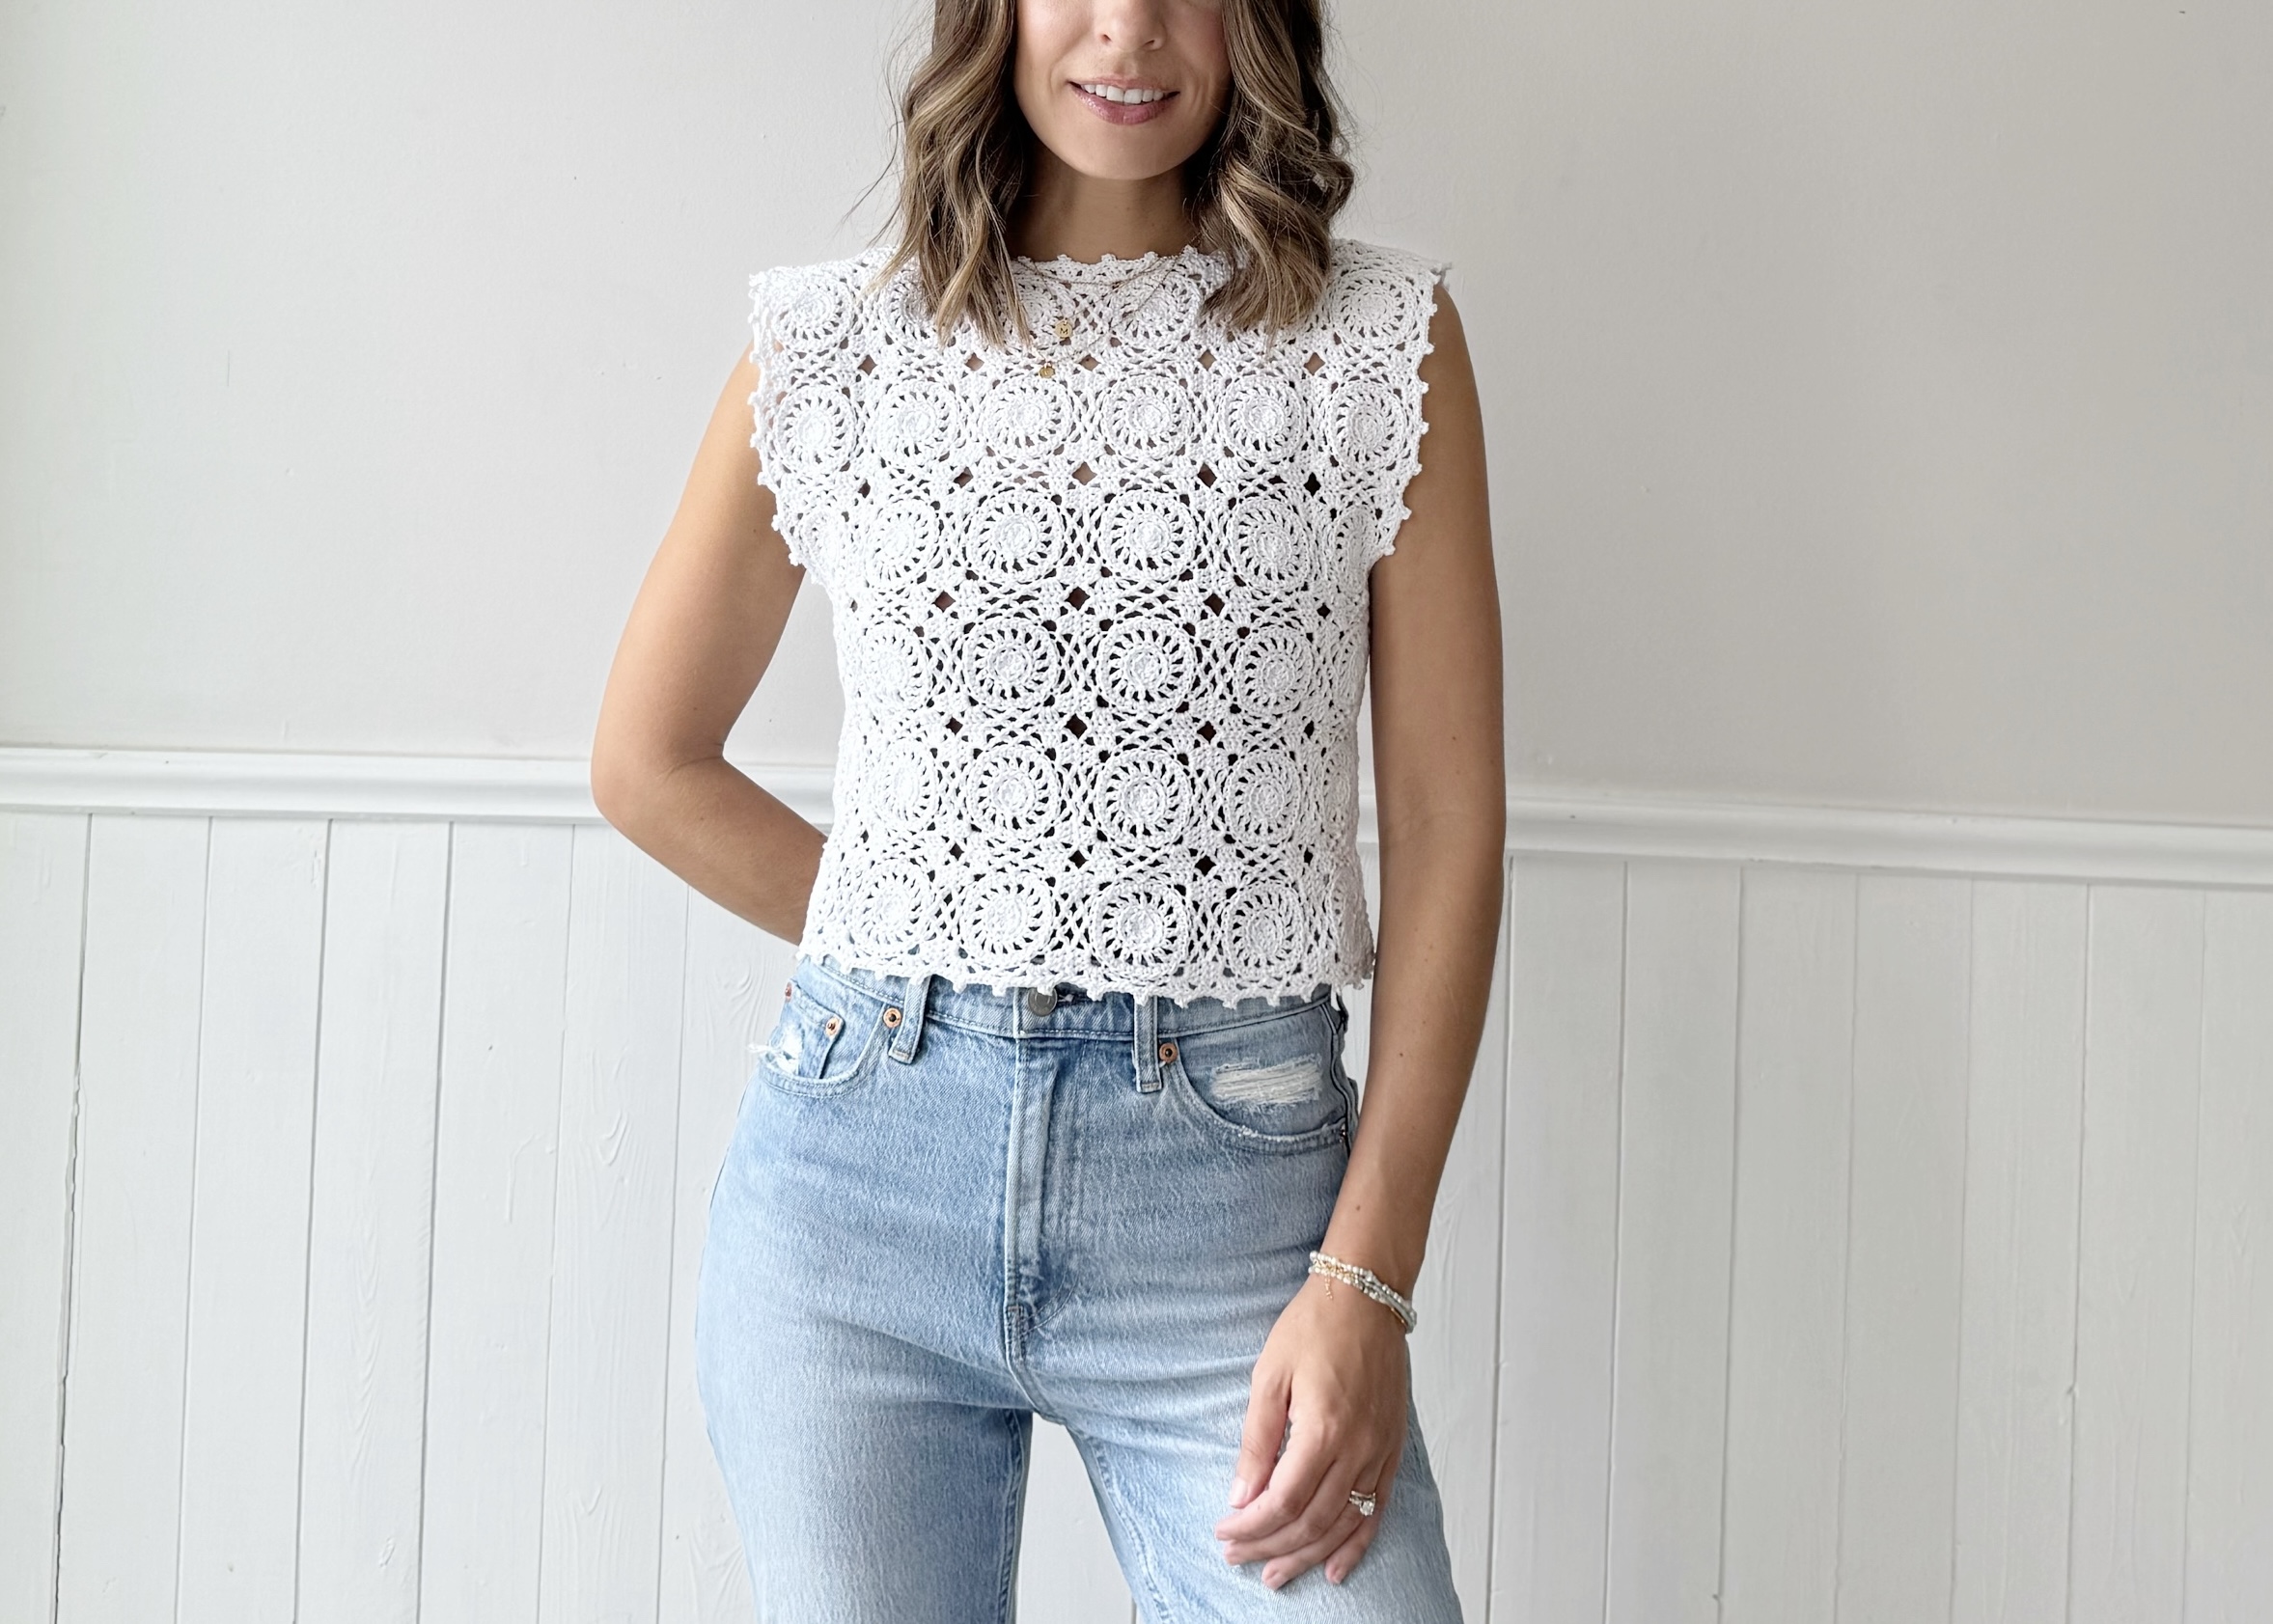
Thank you for looping together this lakeside inspired project with me! I would love to see pictures of your finished Isla sweater so please tag me @LakesideLoops on Instagram and Facebook!
